
Our version of wall crossword game tiles have been incredibly popular - more than 500 homes and businesses now have sets of our tiles on display! We've received great feedback on these, but they need a few little tweaks to be perfect!
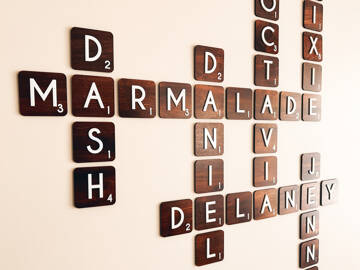
The main change for the crossword tiles is to change how we make the number - the score - that goes onto the tile. The previous version had it in the same colour and material as the letter, and raised off the surface. For example, if it was a gold mirror letter, then the number would be the same.
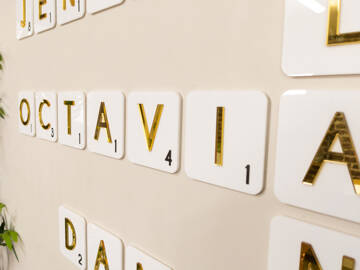
We've now switched this to a printed number instead, and with a colour to match the tile. For white and bamboo tiles, we print the score in black. For Jarrah tiles, we print the number in white.
Why did we make this change? It's actually twofold! The first reason is that it emphasises the letter rather than the score on the tile. When evaluated on a wall, that's the part that we really want to stand out, and having the score in the same colour as the letter, and also raised, did distract from this point.
And the second reason - maybe a touch selfish! - is that it makes the tiles far easier to assemble, as we're only placing the letter. Surprisingly, these are rather labour intensive to make - more on that below - and with the huge demand for these tiles, we needed to make a few changes so we can efficiently make and pack all the crossword tile sets!


Sorry - we've removed black tiles as an option! They were moderately popular - 17.52% of sets at the time of writing were with black tiles - and we will admit they did look amazing! But they pose a long term challenge. They show dust and fingerprints very easily. Sets with black tiles took us twice as long to assemble as we had to constantly clean them as assembling them.
So again - twofold for black tiles - we had concerns about how they would look long term in houses, and secondly, it made it much easier to assemble the tiles without black tiles.
We're happy to make a set with black tiles if you previously had them, or have a specific area that you need black tiles for - just let us know!
We're more than happy to make the old style to match your existing sets - just let us know when ordering new tiles online, and we'll arrange for them to be in the old style. It's no trouble at all!
So how to we make the crossword tile sets? As mentioned before, there is a bit of manual labour involved in these!
When you order, the computer program generates a layout for you. As part of this layout, it breaks down the letters in each word, so we know how many of each letter are required. The letter breakdown includes all letters of each words - so you can rearrange the set later on to add extra names as needed - as you'll have all the tiles. Or you can even break up the words separately as well!
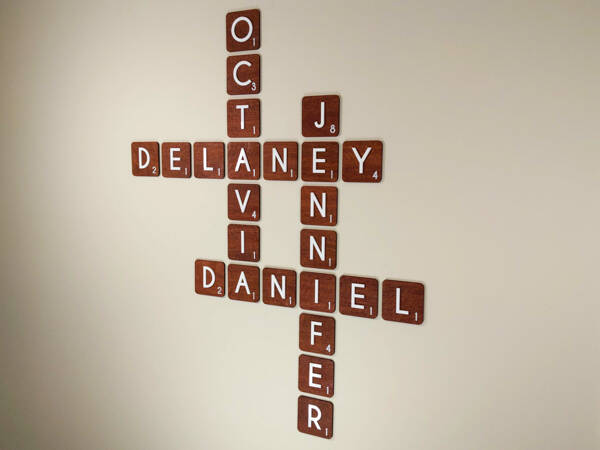
The computer then prints a special layout with all the details we need - like the photo below. It actually prints two copies at once - one for us to write on to check off the letters, and one for us to sign and send with the order.
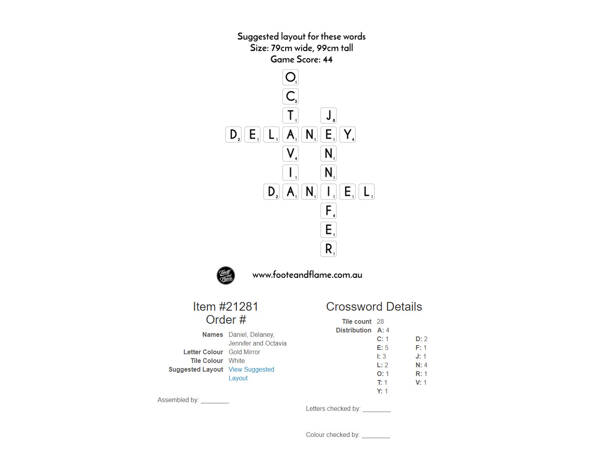
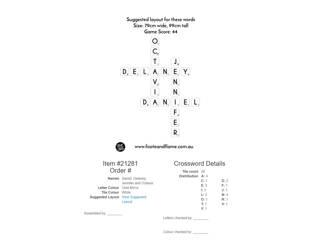
Now we have the information we need - but there is still more required! Based on the "Tile count" printed on the sheet, we can fetch together the number of base tiles we need. Which all get made in slightly different ways!
White tiles are cut with a two part process. Acrylic comes with a protective paper on it to keep it safe during processing. After cutting, this needs to be peeled off. Originally, we did this by hand after cutting - peeling both sides of the tiles prior to assembly. But later we got smarter; we now cut white acrylic into strips that fit 12 tiles, with special locating lugs. We then peel this 12-tile-strip in one go (much faster than peeling 12 individual tiles!) and then place it back through the laser cutter to cut out those 12 tiles. It goes into a special jig designed just for this purpose, that allows the laser to freely cut the tiles without touching any support bars. This isn't a good explanation - but basically, it removes issues with burning under the tile due to flashbacks from the laser cutting table. (Laser cutting is simple at the outside, but as with most things, the devil is in the details to get a perfect finish!).
Bamboo and Jarrah tiles are done differently. The source sheets of bamboo and Jarrah are placed into the machines, and we cut tiles out of them directly, as close together as possible. Due to the incredibly small kerf of laser cutters, the tiles are spaced 1mm apart, significantly reducing waste. After cutting, we unload the machines, sand each individual tile to remove any laser cutting residue and burn marks from flashbacks on the cutting table and to smooth out the surface, and then oil each tile by hand with a furniture grade danish oil. This seals the tiles to protect them - much like you would seal any wood item for display in your home. It also enhances the grain on the wood for a smart looking finish.
Once the tiles are ready, they go into the printer to have the numbers printed on. For the most common number - 1 - they get printed in batches of 12 at a time, which takes approximately 3 minutes. For the other letters, we print them in batches of 4 and just reprint as needed to make up the sets.
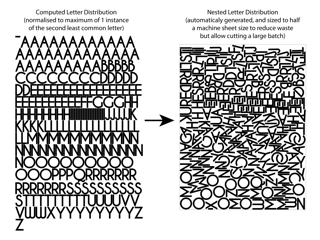
The letters that go onto the tiles are also laser cut. The computer generates the cutting artwork automatically to cut enough letters for a single set. Originally, we used to use this and just cut precisely what we needed for the set we were assembling. However, this became inefficient as it means we had to wait for each set to be cut before assembly.
So we used maths and the data that we had on file! We wrote a computer program to pull all the existing orders, and build a distribution of the letters used. Based on this distribution, we came up with a normalised set of letters that followed the distribution of actual orders. Then we could prepare the artwork for this set, and "nest" them - that is, pack them as closely together as possible to reduce the wasted material on each sheet. Here is the current normalised set, which is also designed to neatly fit into half of one of our standard sheets to further reduce waste.

Before cutting the letters, we apply a specialised sign-grade double sided tape to the back of the sheet. This is laser safe, and is cut through with the letters. The result is letters that have an exact double sided tape applied to the back of them. Just peel, and stick! This tape is strong - and permanent - and once placed, won't come off.
Once cut, we sort out the letters by colour and - you guessed it - letter. They go into special storage containers for quick access during assembly.
Now that we've got tiles and letters, it's time to assemble! Based on the printed distributions, we get to work, generally in alphabetical order. We have a specialised jig that the tiles go into, and then a second alignment plate goes on top. We have a set of 27 alignment plates - one for each letter of the alphabet, and also a dash (-). Each alignment plate has a hole that's shaped exactly like the letter, in exactly the right location for the letter. So we peel the double sided tape, and place the letter. A brayer ensures that the letter is stuck in place. Then we pull the jig apart and end up with a letter!
We then peel the protective paper or plastic off the letter, give it a quick clean if needed, and stack them up. The person who does the assembly signs their initials onto the second copy of the layout - the one that will ultimately be posted out with the tiles.
Once the letters are all assembled, they are handed off to a second person, to double check that we have enough of each letter, and that each letter and tile are the correct colour. (We'll be honest - we did have a few sets that were sent out in the wrong colour combination due to how we used to batch them! Very embarrassing - and we replaced any sets that this happened to). Once this is confirmed, the person who checks this (who must be different to the person who assembles it) initials the "check letters" and "check colour" box. We then pack the letters into boxes.
They're packed into A4 sized boxes, with a specialised cardboard insert to allow making 6 stacks of letters that won't move during shipping. Between each letter goes a specifically cut piece of kraft paper to prevent them from scratching.
We've designed the packaging such that as everything is cardboard or kraft paper, so it's all recyclable. Only the tiles and the template are made from acrylic, but these are meant to be kept with the tiles.
One of the unique features of our website is the ability to generate the crossword layouts for you. It's fun to just play with to see how it would layout - or how the score stacks up! You can try it out online below.
"A big shoutout to Foote and Flame who saved the day with reprinting our Daughters 21st Cake Topper because she has silly parents who left the original one at home which is 4.5 hours away. Thank you so much this was our third order with you well technically four now, fantastic service and recommend this local company to everyone. 🌟🌟🌟🌟🌟"